Working with Photos
ExpertGPS allows you to place photos on your maps. You can position photos by hand, or ExpertGPS can automatically determine the location where the photos were taken through a process called Geotagging, which involves recording a tracklog with your GPS while taking photos with your digital camera. ExpertGPS will then look at the time each photo was taken, and set the photo's location by figuring out where your GPS tracklog says you were at that moment in time.
Adding New Photos using Automatic Geotagging
If you are going to use the automatic geotagging feature in ExpertGPS, read the Geotagging instructions, and then create a new GPX file containing the tracklog from your photo session.
To add photos from your digital camera to ExpertGPS, first copy them to a folder on your computer. For best results, copy them into the same folder where you'll save the GPX file with your GPS data for this trip or project. Then, click on the .
If you plan on sharing this GPX file and the photos with others, start by uploading the photos to a Web site, and add them to ExpertGPS by clicking on the instead.
Once you have selected the photos from your computer, or entered URLs to them, the Geotag Photos dialog will appear.

- Time Zone
- Select the time zone where the photos were taken. Set the Daylight Saving Time checkbox based on whether or not DST was in effect when the photos were taken.
- Fix Camera Clock Drift
- If you synchonize your camera's clock to the time displayed on your GPS each time you photograph, you'll never need to use this setting. If you forget to do it, however, there's still hope. Look at the time on both your camera and your GPS, and figure out which one is ahead of the other, and by how much. Enter those values here, and ExpertGPS will take this correction into account when geotagging your photos.
As you make changes in the Geotag Photos dialog, the photo icons on the map will automatically jump to their new geographic locations. Once you are satisfied that the photos are positioned correctly, click OK to finish the geotagging process.
Adding New Photos and Positioning them Manually
If you don't have a GPS receiver recording a tracklog with you when you take your photos, or you simply want to add informational photos or images to your map, you can manually add photos to ExpertGPS and then drag them onto the map to geotag them.
Click on the , or click to add photos from a Web site.
When the Geotag Photos dialog appears, click Cancel.
Your photos will be listed in the Photo List on the left side of the ExpertGPS window, but they will be highlighted in yellow, the Geotagging Status will say "No Match", and the latitude and longitude will be zero.
Drag one of the photos from the Photo List, and drop it on the map at the location where you want it. The Geocaching Status will change to "Drag & Drop". To fine-tune the location, you can zoom in on the map, and drag the photo again.
Editing Photo Metadata
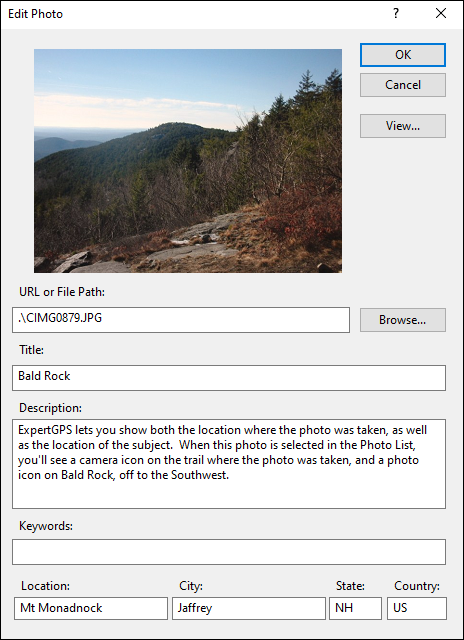
The Edit Photo dialog allows you to tag your photos with additional information that will allow you and others to quickly search for photos. The information you enter here will be saved back into the metadata in the JPEG file itself, and will be available in other programs, on photo sharing Web sites like Flickr.com, and in Windows' search feature.
To edit a photo's metadata, right-click the photo and click . This dialog opens automatically when you add a photo from the Web.
- URL or File Path
- Enter the URL to a photo on a Web site, or the location of a photo on your hard drive. Click Browse to select a photo rather than typing in the path.
- Title
- Enter the title of the photo.
- Description
- Enter any notes or additional information about the photo.
- Keywords
- Enter a comma-separated list of keywords for this photo.
- Location, City, State, Country
- You can enter the location where the photo was taken here.
Saving your Geotagging Changes
The Keep Geotag Location command makes the current geotag location of the photo permanent, and ends the geotagging process. When you are satisfied with the placement of your digital photos on the map, use this command to commit the changes.
To save the geotagging information, select one or more photos that are currently being geotagged. Then, right-click on the photos, and click .
The photo's text will be drawn in black in the Photo List, signifying that the photo has permanent geotagging information associated with it.
To cancel the geotagging process, discarding changes, right-click the photos and click .
To start the geotagging process over again for a set of photos, right-click them and click .
Permanently Deleting and Removing a Photo from Your Computer
If you frequently geotag sets of photos with ExpertGPS, or if you tend to take multiple photos in the field to ensure you get the shot, you may find yourself with duplicate photos of the same location, where only one is needed. The Remove Photo from Disk command permanently deletes the photo from your hard drive. Use this command only to delete a photo you no longer want. Undo is not available for this command.
To permanently remove a photo from your hard drive, right-click on the photos, and click .
Adding New Photos
Editing
- Changing a photo's geotag location.
- Deleting a photo.
- Removing a photo from your hard drive.
- Cut, Copy and Paste.
Viewing Photos
Searching and Sorting
© 1998-2026 TopoGrafix – 24 Kirkland Dr, Stow, MA – Email: support@expertgps.com